Aug 08 2010
Paper Daisies Digital Kit
I’m having fun playing around with My Digital Studio today. Last night I purchased the Paper Daisies digital kit and I can’t stop playing with them! One thing I love about MDS is being able to download new SU! goodies within minutes…instant gratification. I’ve added the daisy I created to my new blog header and matching buttons. What do you think?
You can purchase the Paper Daisies digital kit in my Stampin’ Up! store. Just search for item #121432. They are only $3.95 and include four different sizes. You’ll notice I’ve added color to each layer. Here’s a step-by-step tutorial to get that look:
-
Step 1: In the Design Center window, click on embellishments > add embellishment
Step 2: Click on Paper Daisies under the category list
Step 3: In the Preview Window, click Paper Daises – flower 1 and click the Apply button
Step 4: Repeat step 3 for each flower
Step 5: Close the embellishment window and you should see all four flowers layered on your project. The smallest one will be selected.
Step 6: In the Design Center window, click on Drop Shadow. Change Opacity to 100% and Blur to Full. In the preview window, use your mouse to click and drag the shadow so it’s centered under the daisy. To add color, click on the Change button. Make a color selection, I chose Rose Red. Click the OK button.
Step 7: Repeat step 6 for each flower layer except the bottom one.
I also added a brad in the middle. To do this, repeat steps 1 thru 3 except choose Brads from the category list. Click and drag it to the center of your flower. Once you have your flower finished, you can group all the layers together and then you can move the whole flower around on your project without having to re-assemble it. To do a grouping follow these steps:
-
Click on the brad to select it. Hold down the Ctrl key and click on all the remaining layers. Press Ctrl-G. All layers are now grouped.
I also created a birthday card. I switched out the brad for a circle filled with DSP…
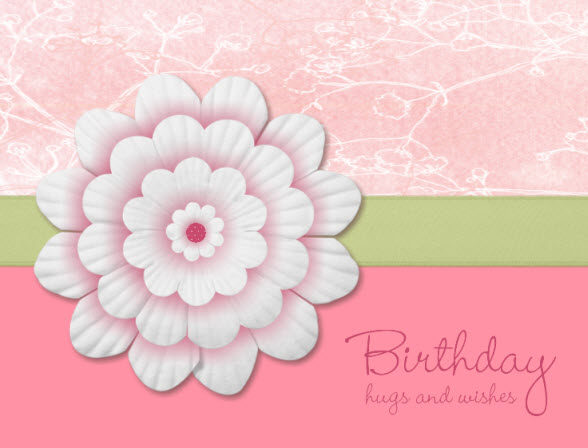
Stamp Brush Set: Hugs & Wishes
Paper: Shades of Spring (Pattern 4) DSP, Rose Red Small Polka Dot (center of flower), Regal Rose
Ink: Rose Red
Accessories: Paper Daisies Digital Kit, Certainly Celery Satin Ribbon
2 responses so far


Beautiful card! I too love My Digital Studio. Thanks for sharing how you colored the daisies.
Thanks for the great tip!!